 ACE: LM-04
CN:GN-025
AVIARIOLUSKYS
AGAPORNIS FISCHER
ACE: LM-04
CN:GN-025
AVIARIOLUSKYS
AGAPORNIS FISCHER
Agradeceré un "ME GUSTA" si así lo consideras
I would appreciate a 'LIKE "if you consider well

ACTA NON VERBA


COMO EMPAPILLAR AGAPORNIS
Vamos a decir unas pautas comunes para criar agapornis con papilla.
Es muy importante tener todo preparado antes de sacar a los pollos. Un lugar donde tenerlos, papillas, jeringas…. Así luego no nos llevaremos una sorpresa desagradable si nos falta algo y no lo encontramos. También tenemos que tener en cuenta el tiempo que necesita que le dediquemos, asi como las horas a las que hay que suministrarle las papillas, que deberemos poder estar disponibles.
¿Cuándo se debe sacar al agapornis del nido?
Lo mejor es sacarlo del nido rondando los 21/25 días de edad. Si lo sacamos antes, la cría será más dificultosa, por necesitar más tomas diarias y una temperatura superior a parte de que necesita una alimentación más específica que le dan los padres, que refuerza sus defensas. Por lo que cometer un error es mucho más fácil.
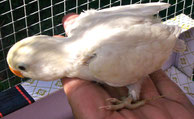
Pollo de agapornis recién sacado para empapillar
El mejor sitio para poner al pollo
Lo mejor es un recipiente de plástico sin tapa, o con una tapa de rejilla. Ya que estos se limpian muy bien, son muy baratos y fáciles de conseguir. En el fondo al principio se puede poner virutas, pero yo particularmente pongo bastante papel. (Estos rollos grandes). El papel le cambio con cada toma. Hay que poner por lo menos 5 capas, para que el pollo no resbale y pueda tener problemas en las patas.
El fauna box debe de estar en algún sitio tranquilo, sin mucho ruido, sin humos y seria bueno que estuviera al principio en penumbra, aunque los pollos de esta edad ya no la necesitan tanto como los más pequeños.
A esa edad es bueno mantenerlos constantemente a una temperatura de unos 22 grados más o menos. Eso lo conseguiremos con una fuente externa de calor, ya sea una manta, una piedra o una bombilla de cerámica. Una bombilla normal no la aconsejo, pues la luz directa les puede molestar mucho. Hay que comprobar que la temperatura no les sube demasiado, si es muy alta veremos a los pollos con el pico abierto y jadeando como que les cuesta respirar.
Si ponemos una piedra es bueno envolverla en papel de periódico o un trapo, para que no queme.
Lo mejor es usar algún método que tenga termostato, para poder regular la temperatura a nuestro gusto. Es muy importante que estén a una buena temperatura pues si no, las papillas se digerirán peor y tardaran más en vaciar el buche. El pollo estará más apagado y podría enferma
La papilla, temperatura y preparación
En el mercado hay muchas papillas específicas y de buena calidad. Le suministraremos una de ellas. En caso de necesidad, se le puede dar papilla 8 cereales. Pero esto no es aconsejable y hacer solo en último caso y hasta que consigamos una papilla especifica para loros.
Para prepara la papilla se calienta un poco de agua embotellada. Que este bastante caliente. Entonces se echa en un pequeño bol la papilla, se añade agua y se remueve hasta que quede de la textura de un yogur batido y sin ningún grumo.
Ahora se comprueba la temperatura. Yo me pongo un poco en la muñeca. Tiene que estar caliente pero no quemar. Si tienes que dar a varios lo mejor, es que mientras das a uno metas el bol al baño Maria para que no se enfríe la papilla. Una papilla fría aparte de que el pollo no querrá tragarla, por no estar estimulado. Tardara mas en digerirse y podrá producirle hongos o bacterias. Por el contrario una papilla muy caliente puede quemarle el buche.
Si preparamos papilla de más y nos sobra, es muy importante que la tiremos. No se puede aprovechar, pues se fermenta y enfermara el pollo.
Las tomas
Dato importante: Dar siempre la papilla por su lado izquierdo del pico, por el derecho la comida le puede ir a la traquea y ahogarse. Mirar que el buche esté vacío o casi vacío. Intenta dar la toma cuando la anterior ya esté digerida, o casi. Si no la comida podría fermentar y provocar la muerte del pequeño. Limpiar con una servilleta o trapito las comisuras. Suelen mancharse, si no se les limpia la papilla puede fermentar ( aunque esa papilla se seque se la terminan comiendo).
La papilla se les puede suministrar de dos formas. Con jeringa en el pico, mas fácil y lento. Y con sonda directamente en el buche.
Para la primera se le pone la jeringa (sin aguja, por supuesto) en el pico y se va presionando poco a poco par llenarle el pico, cuando la traga se llena otra vez y así hasta que toma la cantidad adecuada.
Con sonda es un poco más complicado, pero en cuanto se coge el truco es muy fácil. Se lubrica la sonda con un poco de aceite de oliva para que resbale mejor. Se le pone en el pico y se le echa un poco de papilla , cuando el pollo traga se le introduce suavemente hasta el buche, a continuación se vacía la jeringa lentamente.
Los primeros días les daremos 5 tomas, al principio un poco mas liquidas para que les cueste menos dirigirlas. Luego ya de textura normal y en un par de días bajaremos a 4 tomas diarias.
Las cantidades varían mucho depende de cada polluelo. Pondré unos valores para tres tamaños. Hay que tener en cuenta que son orientativos, pues cada individuo es único y no todos de la misma especie comen lo mismo ni se destetan a la misma velocidad.
Antes de pasar de 4 a 3 tomas tenemos que asegurarnos de que ya come algo de comida sólida. Después de cada toma se lavaran los restos de papilla que tenga el pollo con un trapo o esponja y agua tibia.
Los utensilios también se lavan con agua calienta y se llena y vacía varias veces la jeringuilla, Si se conserva metida en aceite evitaremos que proliferen las bacterias.

Sobre los 30 días de edad ya se les puede poner Mijo en rama ( panizo) y algo de fruta, el pollo por curiosidad ira jugando con ello y poco a poco lo ira picoteando, la fruta se la podemos trocear y dársela al pico, para que la vaya probando.
Una hora antes de cada papilla retiraremos la comida.
Cuando veamos que el pollo va comiendo bien le retiramos las tomas paulatinamente. Primero la del mediodía, luego la de la tarde, seguimos con la de la mañana y al final quitamos la de la noche.
Cada pollo sigue su ritmo, no todos son igual
les, pero pondré una tabla orientativa.
BREEDING LOVEBIRD
Let's say common guidelines for breeding lovebirds with porridge. It is very important to have everything ready before removing the chickens. A place to have them, porridge, syringes .... So then we take a nasty surprise if we are missing something and not find it. We also have to take into account the time needed to devote him as well as the times you have to supply the porridge, that we can be available.
When should you take the lovebird's nest?
It is best to remove the nest hovering around 21/25 days old. If we take it out before breeding will be more difficult, take more shots by day and a temperature above that part needs a more specific power to give parents, reinforcing their defenses. So you make a mistake is much easier.
Chicken freshly lovebirds for empapillar
The best place to put the chickenThe best is a plastic container without a lid, or a lid rack. Since these are cleaned very well, are very cheap and easily available. Basically the principle can be put chips, but I particularly get enough paper. (These large rolls). The role will change with each shot. You have to put at least 5 layers, so that the chicken does not slip and may have foot problems.
The wildlife box should be somewhere quiet, without much noise, smoke and would be great he was at first in darkness, although the chickens of this age do not need it as much as the little ones.
At that age it is good to keep them constantly at a temperature of about 22 degrees or so. That will get it with an external source of heat, either a blanket, a stone or ceramic bulb. A standard bulb not advise, because the direct light may bother them much. We must check that the temperature not up too much, if it is too high we will see the chickens with beak open and panting like they can hardly breathe.
If we put a stone is good wrap in newspaper or cloth, so you do not burn.
Best to use a method that has thermostat to adjust the temperature to your liking. It is very important that they are at a good temperature for otherwise digest porridge is worse and took longer to empty the crop. The chicken will be more muted and could ill
The slurry, temperature and preparation
In the market there are many specific porridge and good quality. We will supply one. If necessary, they can give 8 cereals porridge. But this is not advisable and do only as a last resort and until we get a slurry specified for parrots.
To prepare the slurry is heated some bottled water. Let this pretty hot. Then check in a small bowl porridge, add water and stir until the texture of a yogurt smoothie and without any lumps.
We now check the temperature. I put a little on your wrist. It has to be hot but not burn. If you have to give a number for the best, is that while one targets give the bowl a water bath to keep them warm porridge. A cold porridge except that the chicken does not want to swallow, not being stimulated. Take longer to digest and may cause you fungi or bacteria. Conversely hot porridge can burn the crop.
If more and prepare porridge spare us, it is very important that we throw. You can not take advantage, as it ferments and sick chicken.
The shots
Important Fact: Always give the porridge left side of the peak, for the right food can go to the trachea and drown. See what the crop is empty or nearly empty. Try to take when the former is already digested, or almost. If food could ferment and cause the death of the child. Clean with a napkin or washcloth the corners. Usually dirty, if they are not clean the slurry can ferment (although that mush to dry they finish eating).
The slurry may be given in two ways. With syringe in the beak, but easy and slow. And probe directly into the crop. For the first is put the syringe (without needle, of course) at the peak and goes slowly pushing fill peak torque when the swallows are full again and so on until appropriate quantity. With probe is a bit more complicated, but once you get the hang of it very easy. Probe is lubricated with a little olive oil for better slipping. It puts you in the peak and is poured some porridge, when the chicken is gently placed down to the crop, then empty the syringe slowly.
The first few days they give you 5 shots, at first a little more liquid to direct them they cost less. Then texture and normal in a couple of days go down to 4 times daily.
The amounts vary greatly depends on the chick. I will set values for three sizes. Keep in mind that are approximate, as each individual is unique and not all of the same species eat the same and are weaned at the same speed.
Before moving from 4-3 shots you have to make sure and eat some solid food. After each take to wash the remains of porridge that has the chicken with a cloth or sponge and warm water.
The utensils are also washed with warm water and repeatedly filled and emptied the syringe, if oil remains stuck avoid bacteria to proliferate.
About 30 days old and they can put raw millet (millet) and some fruit, chicken by playing with it curious wrath and anger slowly pecking at the fruit we can chop and give it to the peak, to that go testing.
One hour before each meal porridge retire.
When we see that the chicken is eating good shots will gradually withdraw. First the noon, the afternoon then we continue with the morning and late at night we removed the. Each chicken is its rhythm, not all the same, but put a table for guidance.
Eat Amount AGE
5 4-5ml 21 days days
4 7-8ml 23 days
3 10ml 30 days
2 10ml 40 days
1 10ml 50 days
Weaned 60 days
Example times:
-A) 8 - 12 - 16 - 20-00
-B) 8 - 13:00 to 7:00 p.m. - 00
-C) 8 - 16:00 - 00
-D) 9-00
-E) 00
When it is more or less feathered ratitos we can put in the cage and offer:
Water
Millet
Pasta breeding
We will begin to give little fruit and feed
See reductions in eating less pulp, is taking stronger (millet, pasta breeding, etc.).
In theory two months and has to be eating alone and have a beautiful agaporni papillero, affectionate and playful.